One of the thrills of scuba diving is the ability to defy gravity and remain suspended in the water column while swimming with the fishes at various depths. When new divers first start out, watching an instructor or dive guide hover motionlessly above a training platform or coral reef might seem like a magic trick they’ll never be able to pull off. But achieving weightlessness underwater is actually quite simple. And there’s no magic involved. To master the subtle nuances of neutral buoyancy all you need is a bit of practice — and some patience.
Neutral Buoyancy Basics
What affects a diver’s buoyancy, you ask? The answer: practically everything. That includes your dive profile (depth and changes in depth), the type and size of cylinder used, the type of water you’re in (fresh vs. salt), the amount of weight worn, the type of dive gear and exposure protection worn, your body composition and your exertion/breathing rate.
Depending on the type of dive you plan to do, you might wish to float at the surface before descending to depth and to make it effortless you adjust for neutral buoyancy. Then you might plan to kneel on the bottom (for example, when on a training platform demonstrating skills for scuba certification) and you adjust your buoyancy once more. Then you’ll likely adjust for neutral buoyancy again in order to swim around and explore the dive site. Proper weighting and good buoyancy management allows divers to do all these things.
Here are a few tips that will help you master the subtle nuances of neutral buoyancy:
Sort out how much weight you’ll need.
One way to determine the amount of weight you’ll need to offset your natural tendency to float is to conduct a pre-dive weight check. The weight check can be done in a swimming pool, preferably with a friend to assist you. All you will need is the equipment you plan to wear, your scuba tank and some weights. Start with your buoyancy compensator (BC) inflated and your mask and regulator in place. Assume a near-vertical position (if you are in water shallow enough to stand, lift your feet off the bottom) and begin to vent all the air from the BC as you take a normal, full breath. Hold your breath for a moment and try to remain motionless. If properly weighted for neutral buoyancy, you will float at about eye level to hairline level. When you exhale fully, you should submerge. (For more information, see “Getting It Just Right: The Benefits of the Pre-Dive Weight Check for Proper Buoyancy,” Dive Training , May/June 2017.) One item the article failed to mention regarding the scuba tank used in this exercise is it should ideally contain less than 1,000 psi, because your cylinder will become more buoyant as the air is consumed. If you perform the test with a full cylinder, add five pounds of weight so you’ll be properly weighted when performing your safety stop.
Be sure to write in your logbook the amount of weight (and type of equipment) used for future reference. It is a good idea to conduct a pre-dive weight check any time you make changes to your equipment configuration.
Position your weights so you’ll be streamlined when swimming.
“Trim” is the term used for the streamlined position that should be used while swimming. Distribute your weight so you can assume a comfortable near-horizontal position in the water (photo 1). If you are diving in tropical waters without a thick wet suit, you might not need a lot of weight. In this case, wearing all the weight in your BC’s integrated weight pockets or on a belt worn around your waist might be fine. However, if you are in colder climes where a thick wet suit or dry suit is needed, chances are you’ll need to distribute your weights in a different manner. Experiment with “trim” weights that can be positioned on your tank, clipped to the front of your buoyancy compensator (BC) or worn around your ankles. If you do use these added weights in non-conventional locations, be sure to inform your buddy as to their location, as they are extra weights that might need to be jettisoned if you were to experience a diving emergency.
[ONE] Distribute your weight so you can assume a comfortable near-horizontal position in the water.
Photo by Barry & Ruth Guimbellot.
Get familiar with your BC.
Your BC is made to hold air and to allow you to easily release air. While there are usually only two ways to add air to your BC (by pressing the auto-inflation button or by oral inflation) you might be surprised to learn that there are several ways to vent air from the BC. We recently met a diver who was wearing a new BC on a trip to Mexico, where she was wall diving for the first time. She was delighted to discover that her BC featured a “bottom dump” ripcord that allowed her to vent air from the BC while in a downward-facing position (photo 2). If you aren’t familiar with all the features of your BC, ask the staff at your local dive center to demonstrate them to you.


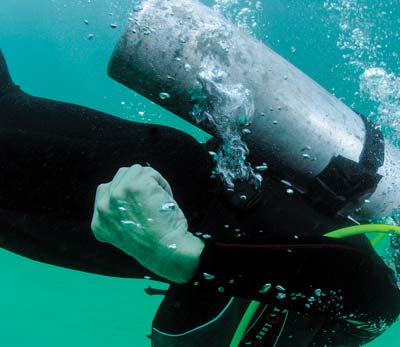
[TWO] There are usually several ways to vent air from the BC, regardless of a diver’s position in the water. Here, a diver is shown pulling the ripcord dump valve located on the bottom rear portion of the BC.
Photo by Barry & Ruth Guimbellot.
Start your initial descent in an upright orientation.
By upright, we mean head up/feet down. Vent air from your BC slowly to enable a controlled descent, using a descent line if it’s available. If you need to ascend slightly to clear your ears, do it by kicking rather than by inflating. It will be easier to establish neutral buoyancy once you are about 15 feet (4.5 m) down. Adding air to the BC when you are shallower might just send you to the surface.
Be patient and take it slowly.
This tip might sound lame, but read on. If you wish to magically remain motionless instead of alternately rocketing upward and then crashing downward, your buoyancy adjustments should be made slowly and steadily. Instead of letting big blasts of air into or out of your BC, try making small adjustments. For instance, if you are having difficulty staying neutral, add a short blast of air to the BC and then breathe in and out normally for at least one breathing cycle, waiting to see how your adjustment — and your breathing cycle — affects your buoyancy. If you need more air, simply add another short blast. The key is to make a series of slight adjustments rather than to rush it.
Dial in your breathing.
Yes, how you breathe is important to your underwater buoyancy. If you are inhaling and exhaling deeply and rapidly, this breathing pattern will contribute to your zigzagging up and down: when you inhale you’ll ascend and when you exhale you’ll descend. The key here is to breathe normally. If at any point you feel you are not in control of your breathing, remember what you learned in your initial scuba training: stop, think, breathe and act. Stop moving and if possible hold onto a descent line or hold your buddy’s hand while you concentrate on returning your breathing to normal. Once you’ve got your breathing under control, adjust your buoyancy as needed and then signal to your buddy that you are “ok” and ready to continue.
Practice perfecting your buoyancy.
At the start of each dive, take a moment or two to get settled. Make any gear adjustments that are necessary, pay attention to your breathing, streamlining and, of course, your buoyancy. Have a bit of fun with this, perhaps by performing the “Buddha” hover (photo 3) or balancing upright with your fin tips only a few feet off the bottom. See if you can achieve perfect neutral buoyancy by adjusting only your breathing depth and rate, or if you can remain weightless in a variety of positions. Invite your buddy to join you.
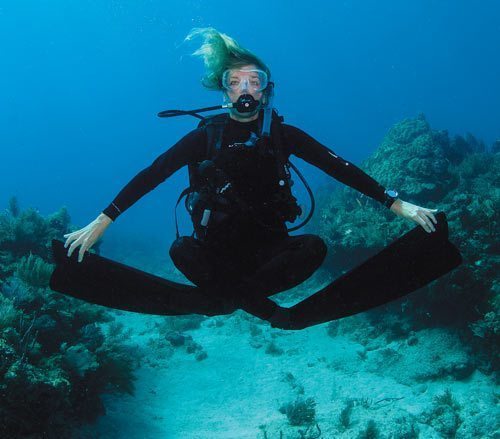
[THREE] Have a bit of fun perfecting your buoyancy control, perhaps by performing the “Buddha” hover. Invite your buddy to join you. Photo by Barry & Ruth Guimbellot.
Remember: “vent before ascent.”
Before you move from deeper to shallower water, vent a small amount of air from your BC to avoid ascending faster than is considered safe. This is especially important when ascending to safety stop depth. Once you reach safety stop depth and are neutrally buoyant, holding onto a line will keep you from getting pushed upward if conditions are choppy.
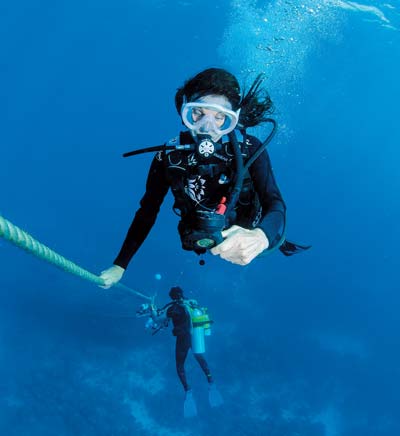
[FOUR] Once you reach safety stop depth and are neutrally buoyant, holding onto a line will keep you from getting pushed upward if conditions are choppy.
Photo by Barry & Ruth Guimbellot.
Take a buoyancy specialty course.
Yes, buoyancy basics were taught in your initial scuba course. But you’ll be amazed at how much better your buoyancy control will be once you’ve completed a specialty course or participated in a “better buoyancy” workshop.
Mastering the goal of weightlessness isn’t magic, but it does require practice and patience. The end result is certainly worth your effort. Make it your goal to maintain neutral buoyancy throughout the entire dive, right up until you reach the surface and inflate your BC.
Story and photos by Barry and Ruth Guimbellot