Once you master the concept, compass navigation becomes second nature. But when you’re trying to learn this much-needed and often-used skill, the effort can make your head spin like a magnet on the north needle.
To simplify the process, compass navigation can be broken into two parts: the mechanics and the math. Scuba students often get hung up on the “math” of determining a compass course (i.e., adding or subtracting degrees), but sometimes the problem lies with the underlying mechanics of using a compass.
This column deals with the mechanics of setting a compass and navigating a reciprocal course. Once you understand how to use a compass to successfully complete basic maneuvers, you’ll be prepared to expand your knowledge with a Compass Navigation specialty course.

[ONE ] The waterproof dive compass is a diver’s primary navigation tool.
Compass Basics
The dive compass (Photo One) is a waterproof instrument used by divers to navigate above water, on the surface and at depth. It determines direction by means of a free-rotating, magnetized needle that always points toward magnetic north.
In addition to the North arrow, which rotates freely beneath the compass’s clear faceplate (either compass in Photo Two), the compass has several other moving parts and features. The red line, which extends top to bottom through the face of the left compass in Photo Two, is the lubber line. The lubber line represents the diver’s direction of travel when held out front pointing straight forward. The right compass in Photo Two has a black lubber line.
In Photo Two the free-rotating white surface that displays the North arrow (N) also displays calibrated degree marks around its perimeter. These are used when the diver knows the heading from a specific location to a specific destination in advance.
The black, numbered calibrated ring around the outside of the face is the rotating bezel. It also displays N (North) and S (South) reference marks. In Photo Two the compass on the left has a large S with a small white point protruding inward toward the face. The compass on the right has only a small S across the face from the North reference marks. Based on the position of the North arrow the reference marks are manually positioned by the diver to maintain a desired course (details under The Mechanics).
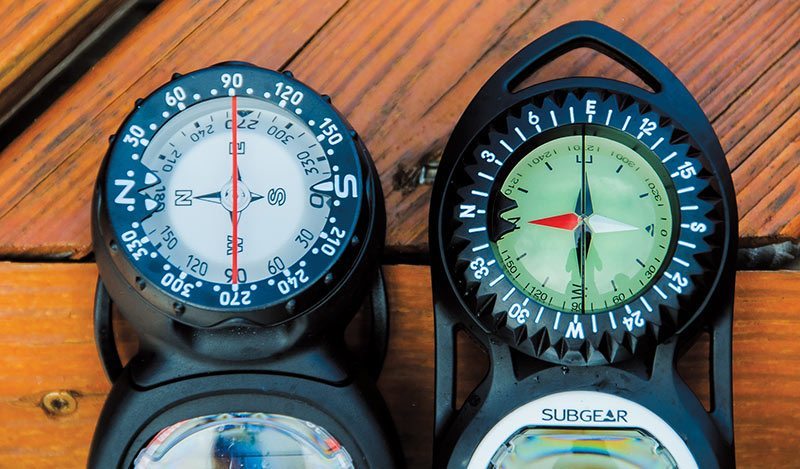
[TWO ] Dive compasses are not all the same, but most have all the necessary features. The one on the left features a red lubber line and hash marks for both North and South. The one on the right has a black lubber line and a reference bracket for North, but only an S for reciprocal use.
The Mechanics
The first step in using a compass is knowing how to hold it. For accurate readings the compass must be held on a level plane — side to side and front to back — so the North arrow rotates freely.

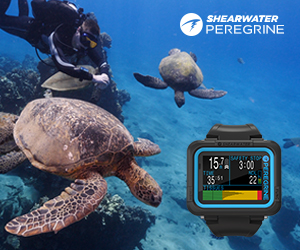
The lubber line is an important aspect of accurate compass navigation. To navigate successfully you must always have the lubber line pointed in the direction you want to go and your body pointed in the direction of the lubber line (Photo Three). To ensure that your body and the lubber line stay in synch, hold the compass out front.
[THREE ] For accurate navigation the compass should be held out front with arms extended. Position it so the lubber line is an extension of your body and points in your direction of travel.
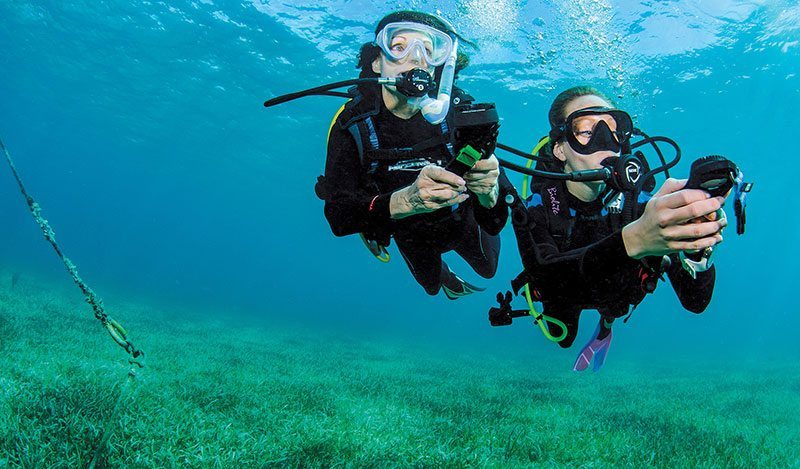
[FOUR] The compass must be held level so the north arrow rotates freely. For best results look over the face rather than down on it.
Using either type of compass, it is important that you keep the compass level so the North needle rotates freely. Instead of looking down on the compass, position it out front and look across it so you can see the needle and where you are headed at the same time. The diver in Photo 5 is looking over the compass, but the face is sloped slightly downward; this will likely cause the North arrow to bind and generate an inaccurate reading.
[FIVE ] Looking across the compass is good, but when it is tilted downward the North arrow may bind, resulting in an inaccurate reading.
Test this on land by slowly rotating your body in a full circle while holding the compass stationary and level. Notice that the North needle continues to point in a constant direction as you turn. If you move too quickly or do not hold the compass level the needle may momentarily shift off north, but will rotate back when the compass becomes level or you stop turning.
To navigate with a compass, simply face the direction you want to go, hold the compass level straight out front and note the position of the North arrow relative to the lubber line. The reference marks on the rotating bezel make it easy to set that course. Simply rotate the bezel until the double hash marks are positioned on each side of the needle, as in Photo Two. While rotating the bezel take care to keep the lubber line pointed in the exact direction you plan to travel.
To follow the course you’ve set, move in a direction that keeps the North needle between the reference marks. If you stray off course the arrow will move out from beneath the reference marks. To get back on course adjust your direction of travel until the arrow is again under the marks. The farther and longer you wander off course (allowing the North arrow to move farther from beneath the reference marks), the less likely you will reach your intended destination when you do correct your direction.
Once you reach your destination, say a wreck or natural feature, mentally note the location or physically mark it, and then use natural navigation to explore the immediate area. When it’s time to retrace your course to the exit, return to the point at which you encountered the feature (the one you marked or made a point to remember) and set a reciprocal course on your compass.
This is done using the second reference mark — the white triangle in front of the S directly across the bezel from the reference hash marks in Photo Two. On your original outward course the tail of the North needle was directly below this mark.
Keeping the compass level and in line with your body, turn around until the point of the North needle is aligned with the white triangle in front of the S. This is the reciprocal course. Follow it by keeping the needle aligned with the white triangle as you swim and you should end up near your entry point. If your direction of travel causes the arrow to stray from beneath the white triangle, adjust your direction until the arrow is again beneath it.
If your compass doesn’t have a second reference mark, as the right compass in Photo Two, the procedure for setting a reciprocal course is slightly different. Start from your original course — hash marks bracketing the North needle. Being careful to keep the compass stationary and level, rotate the bezel until the hash marks are positioned around the tail of the North needle. Then turn your body until the hash marks again bracket the point of the needle. If you’ve held the compass level and your body in line with the lubber line, you’ll be following the reciprocal course back to where you started.
Unlike many scuba skills, compass navigation works the same in or out of the water. Practice the mechanics of setting and following a compass course on land before you try it underwater. Hold the correct arm position, set the reference marks over the North needle and follow the compass course for a dozen or so strides. Set the reciprocal course, follow the return compass heading for a dozen or so equal strides and you should end up at the spot where you started.
Once you have mastered the mechanics of using a compass on land, transferring the skill underwater requires only minor adjustment. You’ll now be swimming horizontally instead of standing. It is tempting to look down on the face of the compass instead of over the top and also to let your wrist twist to get a better view of the face. Either of these mistakes will cause the compass to become unlevel enough to prevent the North needle from rotating freely. Thus, you won’t realize that you are off course until the compass is held more level and you notice that the arrow moves from beneath the hash marks. Be sure to keep your compass arm flat and level from elbow to fingers.
Compass navigation is most accurate when combined with careful monitoring of your depth gauge and attention to the distance or time traveled. Combining compass and natural navigation techniques makes navigation even easier. Master the mechanics of compass use, and the math of navigating more complicated patterns will be an easy next step.
Story by Lynn Laymon | Photos by Barry & Ruth Guimbellot