Years ago when I was working in the tropics as a dive instructor, the first dive of the day was always a guided group dive, but on the second dive of the morning boat trip buddy teams could dive on their own. This made sense because the first dive was a 100-foot (30 m) wall dive, while the second was on a reef with a depth of less than 60 feet (18 m). On the deep dive the guide led the small group through hard-to-find crevasses and chimneys, and made sure no one exceeded the depth profile; on the shallow dive they had the opportunity to take their time exploring wherever they chose without having to follow the leader.
The thing that amazed me was the number of vacationing divers who asked to be guided on the second dive. The problem was that they were afraid they’d have trouble finding the boat at the end of the appointed bottom time. Their underwater navigation skills were either rusty or they had never been comfortable with the basics of finding their way underwater.
Like most scuba skills, underwater navigation is not complicated once you get the hang of it. But until you’ve mastered and are comfortable with the skill, the nagging fear of getting lost, even for a few minutes, is enough to dull your enjoyment of the whole dive. The ability to navigate underwater means not having to go to the surface to see where you are or when you run low on air and thus avoids the potential for long surface swims or needing to be retrieved by the boat.
There are two basic methods for navigating underwater: observing and following bottom features and using a compass. Natural navigation, which can best be employed in water clear enough to allow a reasonable sight distance, involves following a visual course from one underwater feature to the next. When visibility is poor divers rely on their compasses. If you know the course you want to follow, set the appropriate heading and the compass will guide you there and back, if used correctly. Compass navigation is the only option in severely reduced visibility, but in better conditions it can be used alone or combined with natural navigation techniques for even greater accuracy and sense of security.
Successful underwater navigation begins before the dive when you and your buddy decide on a plan.
Predive Planning
First, learn about the prospective dive site. Talk to a local dive professional for an orientation to shore sites or if diving from a private boat. Obtain and study an underwater site map, if available. Ask about prevailing currents and alternate exit points.
On dive charter boats a crewmember typically presents a site briefing before entry is permitted. Pay attention to his/her explanations; for instance, directions to outstanding features such as a sunken boat, a swim-through or a colony of garden eels. Know how deep these features are; this information could prevent you from swimming right by them. If there is a map of the site, sketch it on your dive slate.
Discuss with your buddy a general course to follow during the dive — to swim into the current, key on a particular feature or just head for whatever grabs your attention. To ensure that the buddy team stays together, one diver may be designated as the primary navigator. However, when navigating by observing your surroundings, both buddies should take responsibility for noticing and agreeing on navigation points. If one buddy becomes confused or misses a landmark, the other hopefully will catch it.

Natural Navigation
Natural navigation begins from an established location to which you plan to return. It’s easy if you’re diving from shore along a jetty or similar structure running away from shore; just follow it out, turn around at the previously agreed-upon air remaining or bottom time and return to where you began. Likewise, if diving from a boat anchored or moored on the edge of a wall. Follow the wall, keeping it along one side. Return by placing it on your other side and swimming at a shallower depth until you reach the anchor/mooring.
In less obvious situations you’ll need to select a stationary object on the bottom for your beginning/ending location. If you are entering from shore and following the bottom contour to diving depth, stop as soon as you are comfortably clear of the surf zone and begin noting recognizable features to use as course markers for your return leg. To be effective, features must be large enough to be clearly visible from the opposite direction. The direction to shore may seem clear (it typically gets shallower), but recording specific bottom features on the way out will make it easier to locate the same entry/exit point.
When diving from a boat, the most reliable starting location for natural or compass navigation is on the bottom at the mooring or anchor, as long as that point is not deeper than your planned maximum depth.
The boat itself is not a good starting location because it is not stationary. Vessels can rotate significantly on their axis as wind and currents change and can end up hanging in the opposite direction, several hundred feet from where you started your dive. The anchor and mooring will remain stationary even if the boat does swing.
Before descending, it is a good idea to note on your compass the general direction you intend to swim from the shore or boat. That way, if you know that the wall/wreck/etc., is toward the west, if you do get disoriented, you can head in an easterly direction to find familiar territory. As you descend, do a complete 360-degree rotation, looking for unique bottom features that you’d like to explore and that are noticeable enough to help you locate the boat on your return. Point these out to your buddy so you’ll both be aware of them.
Confirm the direction of travel with your buddy and agree on a prominent feature that is easily visible from your starting point; this will be your first intermediate navigation marker. A feature that is marginally visible could be challenging to locate on the return route if visibility were to decrease during the dive. This and subsequent identifiable features will serve as course markers on your return.
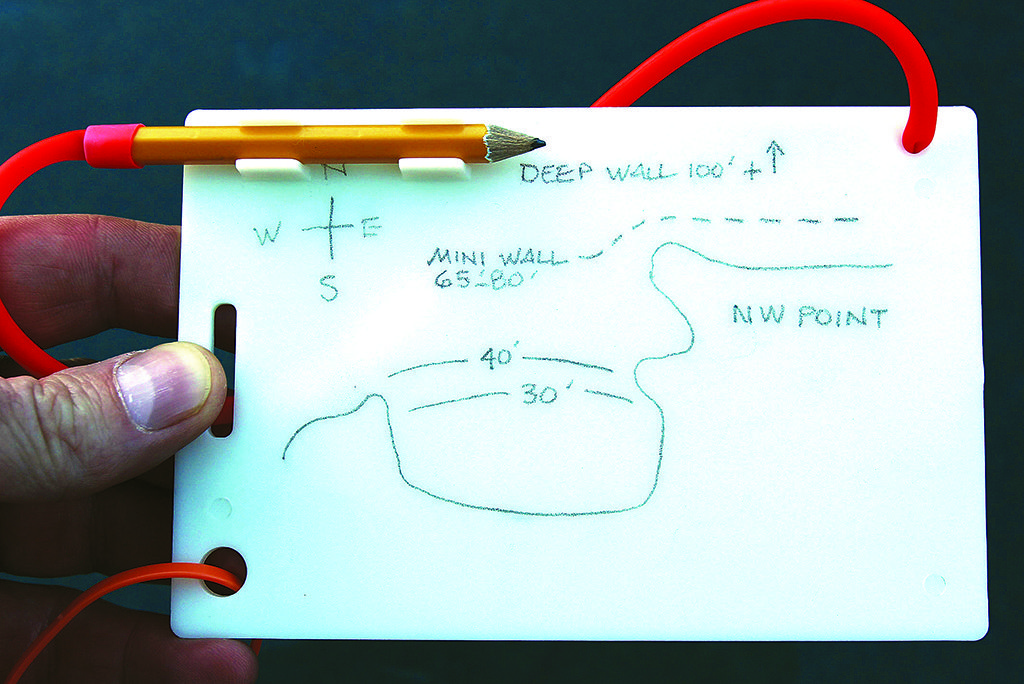
An underwater slate and pencil are the only dive accessories required for natural navigation; they are used to record the course you follow so you can find your way back. Before departing the starting location, mark it on the lower edge of the slate. After identifying the first intermediate feature, sketch it on the slate in its relative position to the starting point. As the dive progresses sketch each subsequent marker feature on the slate.
As you sketch each intermediate feature, turn around to face the direction from which you came. Visually locate your most recent marker and notice its appearance from this vantage point. After you’ve finished exploring the area around each intermediate point, choose another recognizable feature and repeat the process. Draw each navigation point on your slate to guide you on the return trip.
Features often look different when viewed from the opposite side, so always look back to observe the previous feature during each leg of the route. You may even decide that an alternate feature makes a better return marker — perhaps a bright sponge or an odd shape that was not visible from the outward direction. If visibility is questionable, you may want to record the kick cycles between each feature.
When ready to return to the starting location, reverse direction and follow the course plotted on your slate, beginning from the final marker.
Success is in the Details
Natural navigation is all about noticing and remembering details of your underwater surroundings. Your markers can be anything that you know you’ll be able to pick out to guide your return to the boat or shore entry location. Channels between rocky outcroppings or patch reefs often serve as pathways.
In addition to feature mapping there are several other techniques a diver can use to determine if he is headed in the right general direction. Shore divers often note sand ripples, which generally run parallel to shore and become increasingly closer together as they near the shoreline. Current is a natural aid. If the current is coming from your right during the first half of the dive it most likely (though not always) should be from your left when making your way back to the exit location; if not, you may have gotten turned around. Waves move toward the shore as well.
Depth can also be used to determine your whereabouts. Almost always the farther away from shore you go the deeper the water. Generally speaking, if you descend from a boat to the bottom at 60 feet (18 m) and later find yourself in much shallower water, you probably need to head seaward to locate your boat.
Shadows are another navigation aid. At the beginning of the dive note the angle of the sun and where the shadows fall behind underwater features like coral heads or boulders. Although the shadows will move during the dive, their relative position should give you an idea of the correct direction to swim.
You can create your own aid to underwater navigation using a small marker buoy and line. This is especially helpful when shore diving from a site where you’ll use the same entry/exit point. Once you’ve reached the reef from shore, deploy the buoy. Let out a few feet of line, tie the line to a rock and add a small amount of air to the buoy, so that it remains upright. You can explore an area of the reef and then reverse course. When you reach the buoy, you know you’re at the exit point and can then retrieve the buoy and head for shore.
Sound is not necessarily a good aid, although a live-aboard dive boat’s generator can usually be used to locate the boat when its presence is shrouded by poor visibility. At the end of the dive you may return to where you thought the boat was anchored but not see it overhead; however, if you hear the drone of the generator getting louder as you swim, there is a good chance that the boat is nearby.
Natural navigation involves keen awareness of your surroundings while at depth. You’ll not only develop more confidence as an independent diver, but begin to sight creatures and their habitat that you never noticed before. Natural navigation is fun and dependable when practiced faithfully, but knowing how to navigate by compass adds an additional degree of safety, especially when diving in limited-visibility situations.
Familiarize yourself with basic compass navigation before you set out on your first dive trip. Knowing how to navigate a simple out-and-back course will add to your confidence while diving.
Compass Basics
Navigating by compass involves following one or more headings, then reversing course to return to where you started. Experienced divers often combine compass headings and measured distances to navigate a geometric pattern — square, rectangle or triangle — that leads them back to the starting location without backtracking. Compass navigation can be used in any water clarity and is the most reliable technique for navigating when visibility is limited.
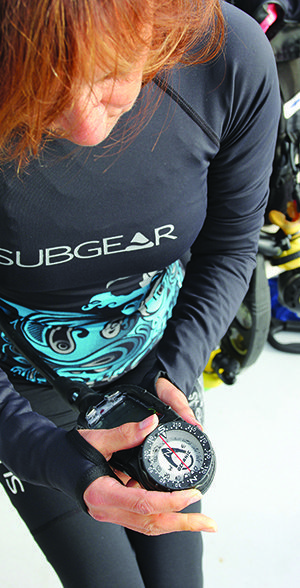
The primary functionality of a compass is showing the direction of magnetic north. Although all underwater compasses perform this basic function, their features are not exactly alike, depending on whether they are direct reading or indirect reading.
The most essential component of a compass is a freely rotating needle magnetized to point north. This needle or card “floats” in liquid rather than air to offset the effects of water pressure. The card is painted with the north arrow and the cardinal points (N, S, E, W) and corresponding degrees of the compass (e.g., 0 = south, 180 = north). The compass must be held level to ensure that the card floats freely, allowing the north arrow to point accurately.
Compasses also feature a “lubber line.” This is a large arrow or lines painted across the compass face, often in red, used to indicate the diver’s intended direction of travel. It is important for accurate navigation that the compass is held so the lubber line is always a forward extension of your body.
Reference marks are located on the rotating bezel. These usually take the form of two prominent hash marks extending inward from the bezel. To set a course, hold the compass level and position these marks over the north arrow. Many compasses also include an alternate reference mark — a single hash mark or white dot on the bezel — directly opposite the double marks. This additional mark makes navigating a reciprocal course — out and back — very simple.
Degree markings are used for taking bearings and following headings to particular objects and are not necessary for basic compass navigation, except to add or subtract angles for geometric turns.
Compass Navigation Techniques
The concept behind compass navigation is relatively simple, but remembering and applying the mechanics can become confusing. The first step in using a compass is to know how to hold it so the lubber line is pointed in the direction you want to go and your body is in line with it. With a wrist-mount compass, extend the arm without the compass straight forward and grasp that elbow with your compass hand, forming a right angle. Be sure to keep your wrist straight and flat so the compass remains level and at eye level when swimming so you look over it, not down at it.
If using a console-mounted compass, hold the compass level with both arms stretched out in front of you. Some divers mount their compass on a small board similar to a pool kickboard to ensure they follow the lubber line. Instead of looking down on the compass, look over it so you can see the needle and where you are headed at the same time.
A compass can also be mounted on an underwater slate, which makes it easier to hold level and to point accurately. Plus, the marker features that you’ve drawn on the slate for natural navigation can be aligned to the north.
Compass navigation begins with setting your course from the anchor, if boat diving, or the shore entry location. Face the direction you want to go, holding the compass level with the lubber line aimed in the same direction. Unless you happen to be facing north, the north needle will be pointing at an angle to the lubber line. One of the most common mistakes in compass use is to confuse the direction of the north needle with the direction you want to go. The north needle will always point north, regardless of which direction you face; if you rotate your body the needle will stay relatively stationary while the compass case moves.
To set the course physically, rotate the compass bezel until the double hash marks are positioned directly over (on either side of) the north needle. Then swim in the direction that keeps the north needle within the reference marks. If you stray off course the arrow will move out from beneath the marks. To correct your course, adjust your direction of travel until the arrow is again beneath the marks.
Once you reach your destination, say a wreck or natural feature, use natural navigation to explore the area. When it’s time to retrace your course to the exit, return to the point at which you reached the feature and set a reciprocal course using the second reference mark on the compass — the single hash mark directly across the bezel from the double hash marks. At your original course setting, this mark is aligned with the tail of the north needle. Keeping the compass level and the lubber line in line with your body, rotate your body until the head of the north needle points to the single hash mark; this is the reciprocal course. As you swim keep the needle aligned with the mark and you should end up near your entry point.
You can also set a reciprocal course by rotating the bezel until the double hash marks are positioned around the tail of the north needle. Then turn your body until the hash marks again bracket the point of the needle.
The compass can also be used to navigate from a known location to a specific dive site — if you know the heading. This technique is often used to reach known near-shore sites or to find a specific location when beginning the dive from a mooring. The heading, however, is only valid when starting from the predefined location.
To navigate a pattern, such as a square or rectangle, simply add or subtract 90 degrees to/from the heading. For an equal-sided triangle add or subtract 120 degrees for each turn.
The compass can be used on the surface as well. If you become directionally disoriented while at depth and need to surface to find your bearings, with the lubber line pointed toward your destination, set the hash marks over the north arrow. With the heading set, you can either follow it while snorkeling back or descend and follow the heading underwater.
The accuracy of a compass course is affected by several factors. A crosscurrent can push you off course sideways; to compensate swim slightly into the flow. A head-on current can cause you to use more air and bottom time than expected before reaching your destination. The direction of the north needle can be affected by nearby large metal objects, such as a shipwreck; when returning from such a site move away from the wreck before setting the reciprocal course.
While natural navigation works well for sites with distinctive bottom features and good visibility, compass navigation will get you there and back reasonably well in any visibility. Combine navigation methods for the best results. Note your initial direction from the starting point, pay attention to bottom features and water movement as you explore and measure distances by time, kick cycles or air usage. Take an underwater navigation specialty course to increase your navigation knowledge and further hone your skills. Knowing you can accurately navigate underwater is an important step toward becoming a confident, independent scuba diver.
Personal Navigation Aids
Easy-to-use acoustic navigation systems have been on the market for more than a decade although they are not yet common among recreational divers. A transponder is hung several feet below the surface under the boat or secured in the water near the planned exit location if shore diving. Depending on the brand, the small receiver is wrist-mounted, secured to your buoyancy compensator or placed in a pocket. While underwater the diver occasionally establishes his location and approximate distance relative to the transponder. When ready to return to the exit, he identifies the direction and distance to the transponder and simply follows the signal, which visually indicates the proximity of the transponder.
GPS systems are common for everyday navigation topside. Although several patents have been issued in the past decade for underwater navigation systems based on GPS, as of this writing working systems are still in development. GPS positioning is based on line-of-sight communication with a satellite. Underwater, however, a GPS signal quickly weak-ens, therefore the basic design of these systems incorporates a sending device with an above-water GPS antenna that communicates acoustically with a wrist-mounted transducer on the diver.
Once perfected, underwater systems promise to offer many of the features of a handheld GPS, including current heading and direction to the sending buoy, underwater terrain maps and marking interesting locations.
Personal Signaling and Communication Aids
In addition to being proficient navigators, every diver should also be equipped with accessories that will help him or her be seen at the surface. A variety of devices are available, including inflatable “safety sausage” buoys, strobe lights, reflective marker tape, a whistle or air-powered DiveAlert™ audible alarm. These safety accessories make it easier for the boat crew to see and hear divers waiting at the surface. In addition, a waterproof two-way/VHF radio and GPS locator such as the Nautilus LifeLine™ puts a diver in direct contact with their boat and/or any vessel in the area on universal Hail and Distress channel 16. Devices like these are particularly useful when diving in remote areas and where weather conditions can abruptly change.