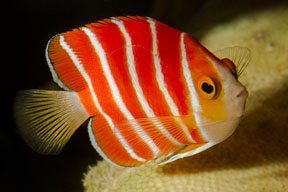
The odds are extremely high against you ever seeing the gorgeous 3-inch-long (7.6 cm) fish pictured on this page during a scuba dive.
That’s because the only place the candy-striped, peppermint angelfish is known to live in reefs 350-450 feet (106-136 m) deep off the Tahitian island of Moorea. The fish was collected by the highly accomplished rebreather diver and deep-water explorer, Richard Pyle, Ph.D., of Hawaii’s Bishop Museum, and is on display at the Waikiki Aquarium.
It might surprise you that I chose to feature a captive specimen in a column in a magazine dedicated to scuba diving, but there are some captive subjects that we are unlikely to encounter in a lifetime of diving that make a nice addition to our photographic libraries. However, successfully creating those images requires some techniques that are significantly different from the ones we typically employ when shooting underwater.

Photo by Marty Snyderman
In addition to your camera, you will need an external flash that can be moved away from the body of your camera and into the most desirable position to light your subject.
When lighting your subject you will want to handhold or mount the head of the flash flush against, and I do mean squarely in contact with, the glass surface you will be shooting through. If the flash is moved the slightest distance away from the glass or angled in any way, you are highly likely to create a horribly distracting hotspot in your picture.
Position the lens flush against the glass wall of the aquarium. Hold the lens away from the glass and you are highly likely to reveal undesired glare and reflections. In addition, you are likely to see any dirt, scratches and other imperfections in the aquarium window.
In underwater photography we often position a strobe behind the plane of the camera sensor to prevent the glare and backscatter that often appears in pictures when the head of a strobe is positioned too close to the boundary of the area the lens records. But when shooting through the glass of an aquarium window, you want the forward edge of your flash to extend as far forward as the front of the lens. This configuration allows you to simultaneously place both the flash head and lens flush against the window you are shooting through.
For the accompanying image I used my strobe’s “automatic exposure” capability, but noting the numerous vertical white stripes in the angelfish’s body, I set the flash to underexpose the scene by one f-stop. This setting enabled me to avoid overexposing those white highlights. And with the lens held flush against the aquarium glass, I was able to use my camera’s auto-focus capability to focus the lens.


