Over the last several decades, modern scuba equipment has benefitted from a variety of technological improvements. Some significant changes have been made on the buoyancy compensator (BC). The BC has evolved from what essentially started out as a bulky, uncomfortable lifejacket to a trim, lightweight and comfortably fitting device that allows you to make easy buoyancy adjustments while at both depth and surface.
BC Basics
For the majority of BCs, the primary auto-inflate/deflate mechanism is located at the end of the corrugated BC hose, which is typically located on the left front side of the BC. The BC connects to the tank’s air supply via a low-pressure inflator hose attached to the regulator first stage and features two buttons (Photo 1). When you depress the auto-inflate button, air flows from the tank into the BC. This is the most common way to inflate the BC. You can also orally inflate the BC by depressing the inflate/deflate button while blowing air into the mouthpiece opening on the BC hose. Both inflation methods work regardless of your body position in the water.
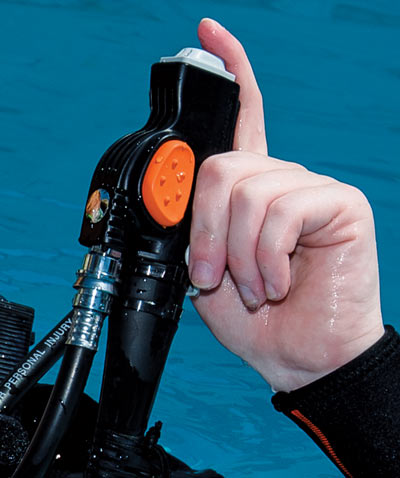
[ONE] The BC connects to the tank’s air supply via a low-pressure inflator hose attached to the regulator first stage. When you depress the auto-inflate button (shown here in orange), air flows from the tank into the BC. The inflate/deflate button (shown here in gray) is for deflating and/or orally inflating the BC.
When it comes to venting air from the BC, keep two things in mind:
- Air is lighter than water, so any air added to the BC will rise to its uppermost area. When venting air from the BC, always use the uppermost vent (this will depend on your body position in the water)
- BC dump valves/vents vary from one model to the next. When buying a BC, ask the pros at your local dive center to demonstrate the various inflate/deflate options available.
Upright Options for Venting a BC
The following methods will work when you are in an upright (head up/feet down) position in the water. An upright orientation is recommended when making your initial descent from the surface, as most divers find equalizing is easiest from an upright position. Also, if you have difficulty equalizing or you experience pain in the ears and/or sinuses while descending, it’s easy to halt your descent and ascend slightly just by kicking a few times. After a slight ascent you can continue the descent/equalization process again.
The raised-hose method. Practically every BC model can be vented this way. Using your left hand, grasp the bottom of the BC hose and raise it straight up. Press and hold the deflate button located on the end of the hose until a sufficient amount of air is vented from the BC (Photo 2). You can facilitate air movement from the BC by tilting your body to the right, so your left shoulder is the highest point. When using the raised-hose method, it’s important to hold the hose high. A kink or s-curve in the hose will prevent air from escaping.
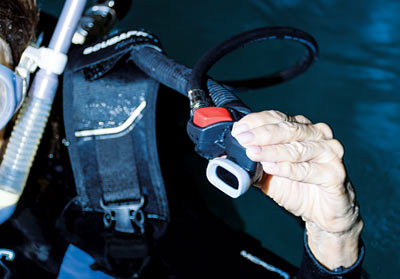
[TWO] Using your left hand, grasp the bottom of the BC hose and raise it straight up. Press and hold the deflate button located on the end of the hose to vent air from the BC.
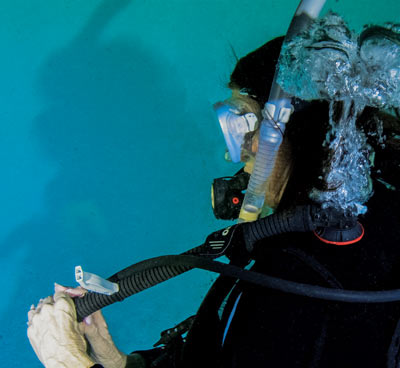
[THREE ] Some BCs feature a pushbutton or toggle vent at the top of the corrugated BC hose. On some models, you can pull down sharply on the BC hose itself to activate a dump valve, as shown here.
Horizontal or Inverted Options
Once you have descended to dive depth, it’s not likely that you’ll remain in a vertical, upright position. Instead, you’ll want to adopt a more streamlined, horizontal position while swimming. You can still vent air from the BC using the vertical methods mentioned above, provided you raise your torso slightly and also rotate your body to the right or left, depending on which shoulder dump valve you intend to activate. However, this isn’t the simplest, most efficient way to vent air when in any position other than upright (head up/feet down), which is why your BC is built with multiple venting options. Another dump valve and ripcord is located at the bottom rear of the BC (usually on the right) but in some models you’ll find rear dump vents on both left and right sides.
The rear vent method. To let a bit of air out of the BC while swimming along the reef in a downward-facing horizontal position, reach behind you to locate one of the ripcords. Bend slightly at the waist (shoulders lower than hips) so any air in the midsection of the BC moves to the rear and is expelled as you pull the ripcord (Photo 4).
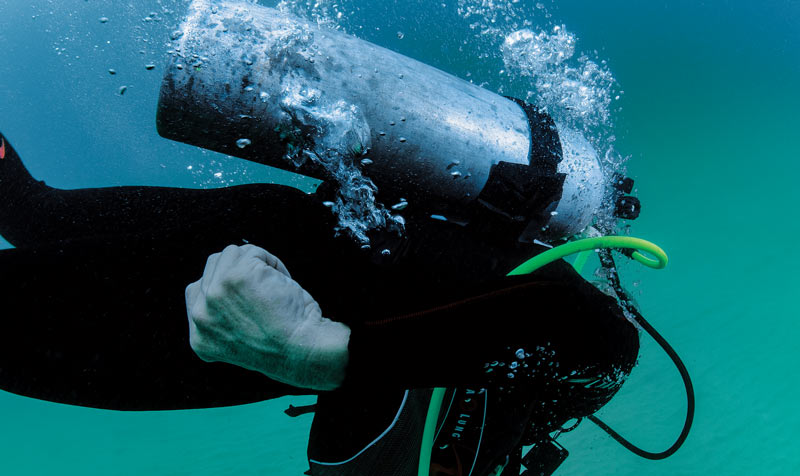
[FOUR] To vent air while swimming in a downward-facing horizontal position, reach behind you to locate one of the ripcords. Bend slightly at the waist (shoulders lower than hips) so any air in the midsection of the BC moves to the rear and is expelled as you pull the ripcord.
Better Buoyancy
Now that you are familiar with how to add to or vent air from your BC, we’d like to remind you of a few simple tips for better buoyancy control.
First of all, know your gear. If you are the happy owner of a new BC, take time to carefully read the owner’s manual. Put the BC on and familiarize yourself with how it works. Once you are comfortable with the configuration of the BC, plan a session in a pool to simulate diving experiences requiring the use of the inflate/deflate mechanisms. In addition, ask your local dive center about “peak buoyancy” courses designed to help you master all the nuances of buoyancy control.
When descending or ascending, make small adjustments and do so slowly. Most new divers make the mistake of adding or venting too much air, too quickly, when attempting to adjust their buoyancy. Keep in mind that your breathing (the air in your lungs) has an effect on your buoyancy. When making adjustments, let a short burst of air in/out and then take a breath in/out. Wait a moment to gauge your current state of buoyancy before you make additional adjustments.
Also keep in mind that your weighting and trim will affect your buoyancy and body position in the water.
Remember that air added to your BC while at depth, must be vented as you begin your ascent. As you start for the surface, vent a small amount of air from the BC and remain ready to vent more air to ensure a safe ascent rate.
Buoyancy control is essential to your safety and enjoyment underwater. It’s also important to know how to work your dive buddy’s BC in the event he or she needs assistance, so be sure to make this a part of your pre-dive safety check.
Being weightless underwater is part of the magical experience of scuba diving. Mastering the subtleties of buoyancy control will make you a safer, happier diver.
A Different Design
At least one manufacturer has designed a BC featuring a non-traditional inflate/deflate system. A one-touch lever is positioned in the lower left pocket area. Press down on the lever to vent air from the BC. Pull up on the lever to inflate the BC. When pressing down, all valves will open at the same time.


